Image Browser · Burnham-on-Sea History Project
User Guide: finding and looking at photos
For everyone. No computer experience needed: if you can click a mouse or tap a screen, you can use the Image Browser.
1. Opening the Image Browser
The Image Browser is a website, so you use it in a web browser such as Microsoft Edge, Google Chrome, Firefox or Safari. Your community centre will tell you its address, or will already have it open on the computer for you.
When it opens, you'll see lots of small photos straight away. You don't need to log in, and you can't change or break anything, so feel free to click around.
2. What's on the screen
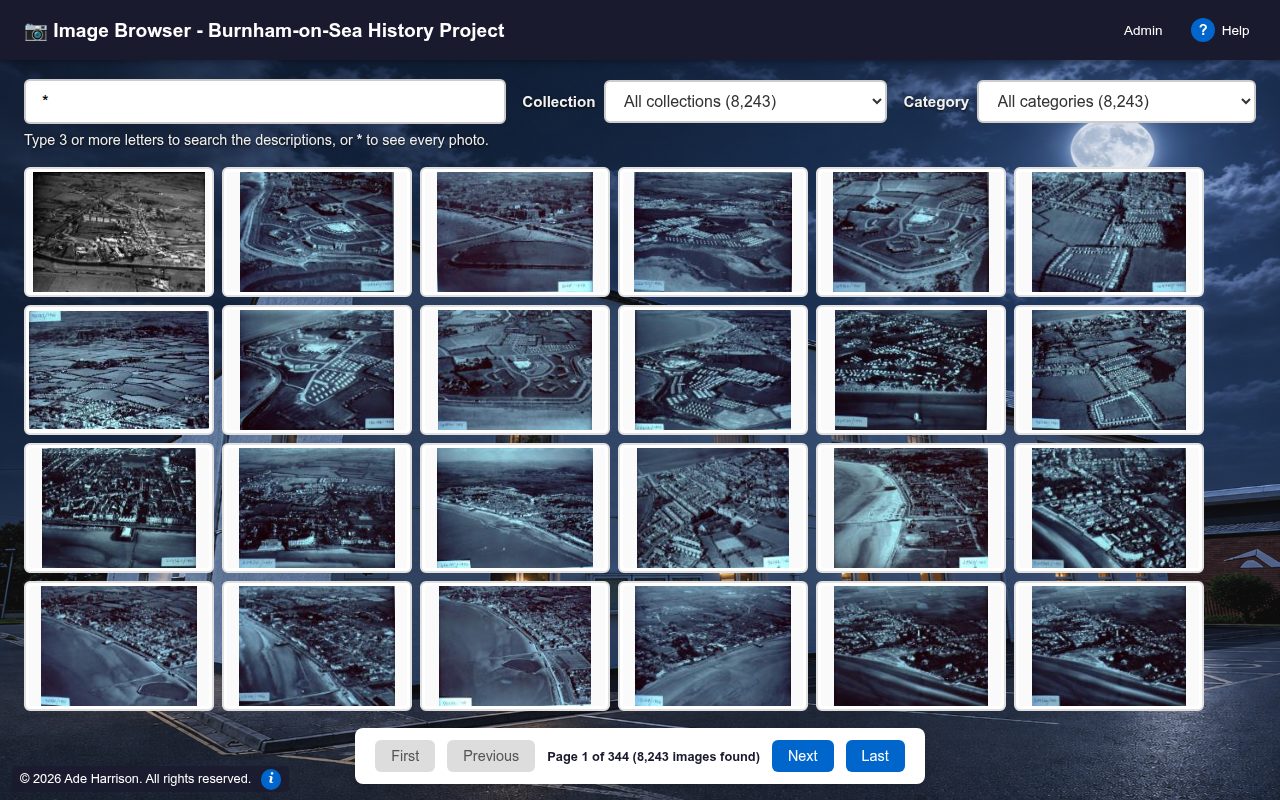
From the top of the screen to the bottom:
- The title bar, with the name of the site. Clicking the title always takes you back to the start. (How many photos there are in all is shown in the All collections list.)
- The search box (the long white box), where you type what you're looking for. Under it, a reminder: Type 3 or more letters to search the descriptions, or * to see every photo.
- Two drop-down lists, labelled Collection and Category: All collections and All categories. They let you look at just one group of photos.
- The photos, as small pictures called thumbnails.
- The page buttons (First, Previous, Next, Last), for moving through the photos a screenful at a time.
- The small print along the very bottom: the copyright, and a small blue i. Point at the i to see who to contact and which version of the Image Browser this is. Otherwise you can ignore it.
Good to know: Help, with a blue ?, in the top right-hand corner opens this guide in a new tab (on a phone, only the ? shows). The word Admin next to it is for the people who look after the Image Browser. It asks for a password, and you don't need it to look at photos.
3. Looking through every photo, page by page
When the Image Browser opens, the search box holds a star, *. The star means
"show me everything", so you're looking at every photo, one screenful (a page) at a
time.

| Button | What it does |
|---|---|
| Shows the next page of photos. | |
| Goes back one page. | |
| Jumps back to the very first page. | |
| Jumps to the very last page. |
The words in the middle tell you where you are, for example Page 1 of 273 (6,535 images found). A button that is greyed out can't be used just now: on the first page, for example, there is nothing before it, so First and Previous are grey.
The Image Browser fits as many photos on a page as your screen has room for. A bigger window shows more photos per page, and if you change the size of the window the page fills up again.
4. Searching for something
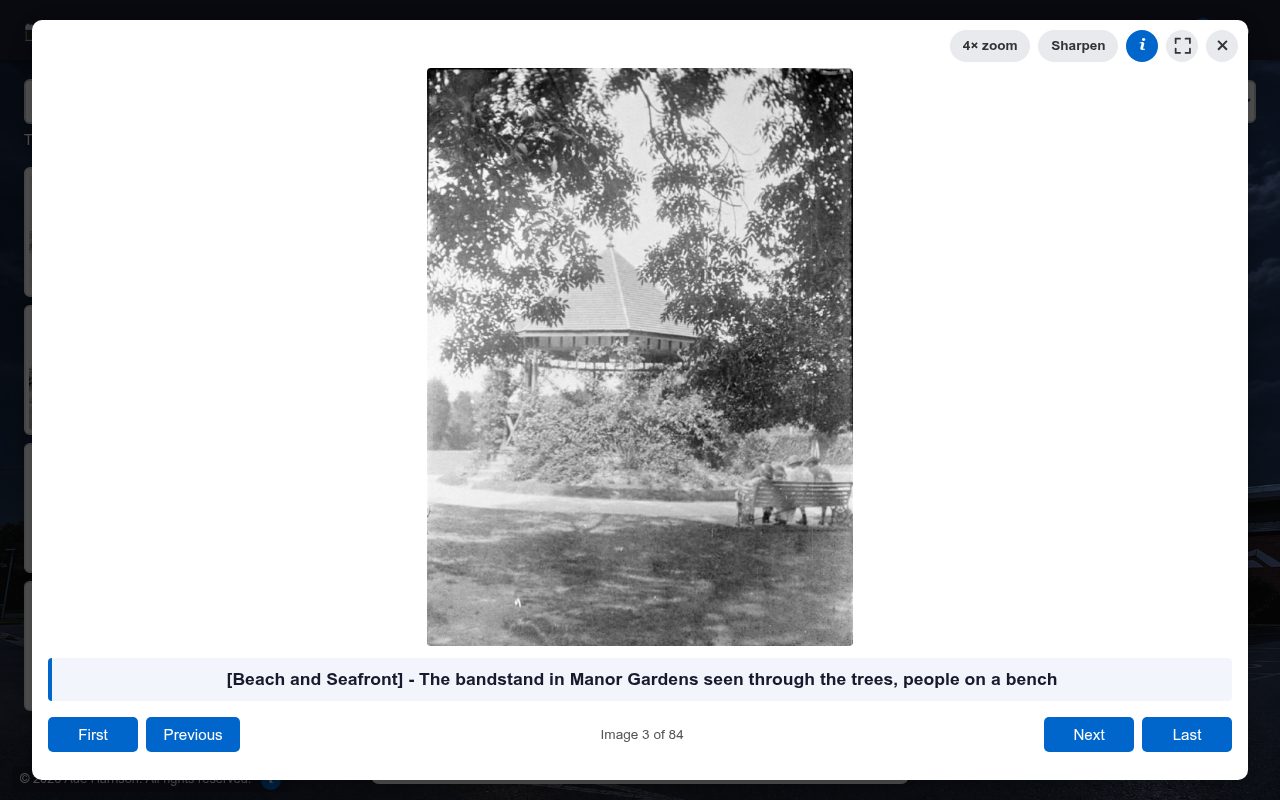
Every photo has a written description, such as "The bandstand in Manor Gardens seen through the trees, people on a bench". Searching finds the photos whose description contains the words you type.
- Click in the search box. The star
*is highlighted as you click, so whatever you type replaces it. - Type what you're looking for, for example
pier. - Wait a moment. The matching photos appear by themselves; you don't need to press Enter (but it does no harm).
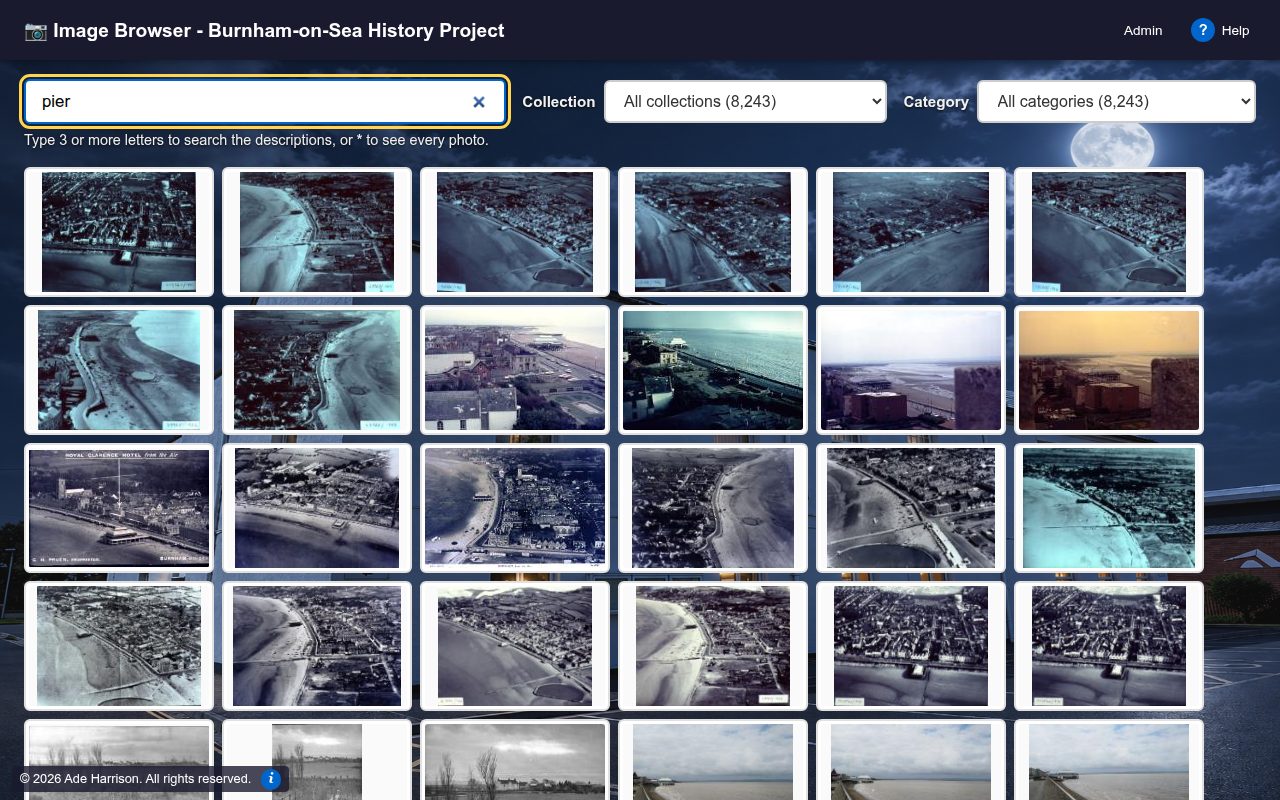
Tips for searching
- Type at least 3 letters. With fewer, the Image Browser waits and shows
"Type at least 3 characters to search…".

- Capitals don't matter.
Pier,pierandPIERall find the same photos. - Part of a word works too.
lightfinds "lighthouse" and "lights";esplanfinds "Esplanade". - The words are matched exactly as typed, in that order.
high streetfinds "High Street" but not "Street, High". If you get nothing, try fewer words, or just one. - You can search for a year, such as
1911, or for a category's name, such asaviation, because these are part of each description, for example "[Aviation] - Mr Hucks publicity photograph (1911)". - A search shows at most 500 photos. If there are more, a note under them says so: add another word to narrow it down.
If nothing matches, you'll see "No images found." Check the spelling, or try a shorter word.

Going back to every photo
Click the small blue × at the right-hand end of the search box. The star
* comes back and you're looking at every photo again. (Or delete what you typed and
type * yourself.)
5. Narrowing it down: collections and categories
The two drop-down lists next to the search box let you look at just part of the archive.

- Collections (the list labelled Collection)
- Where the photos came from: each collection is one album or box of photos given to the project, for example W-Thomas-Negatives or W-Thomas-Slides.
- Categories (the list labelled Category)
- What the photos are of, such as Beach and Seafront, Railways or Churches and Religion.
- Click a list to open it.
- Click the collection or category you want. The photos change straight away.
- To see everything again, choose All collections or All categories at the top of the list.
The number in brackets after each name is how many photos it has, for example Beach and Seafront (83). When you choose a collection, the numbers in the categories list change to show how many of that collection's photos are in each category. A category showing (0) has none in that collection.
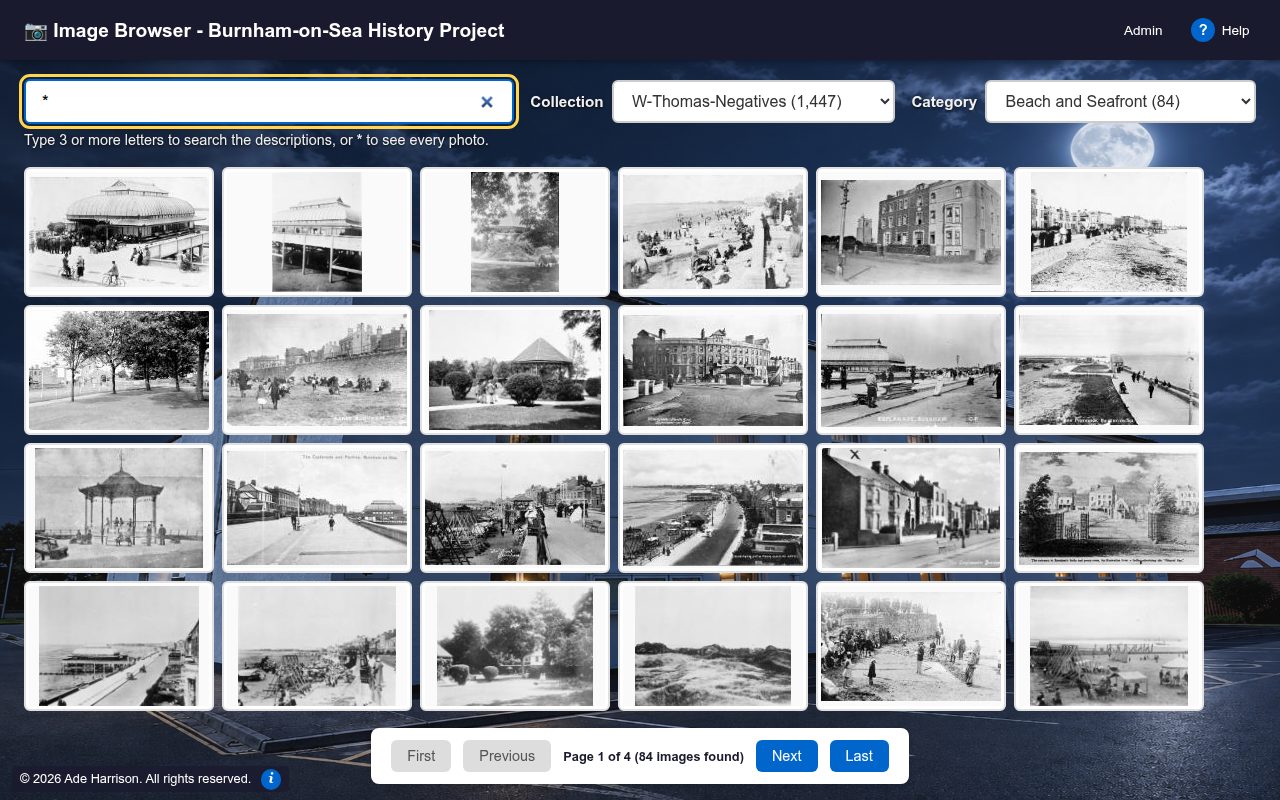
You can combine all three. Choose a collection, a category, and type
a search, and you'll see only the photos that match all of them. For example: the
Railways category with the search station.
6. A quick look: holding the mouse over a photo
Rest the mouse pointer on a photo without clicking. After half a second a small dark box appears with that photo's description. You can move the pointer onto the box to read it; move the mouse away and it disappears. It also appears when you move to a photo with the keyboard, and Esc closes it.
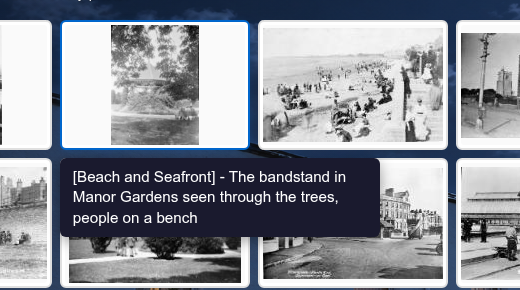
The part in square brackets at the start, here [Beach and Seafront], is the photo's category. If the year is known it's shown in brackets at the end, for example (1911).
7. Looking at a photo full size
Click any photo to open it big, in the middle of the screen. This is the viewer.
Moving to the next photo

The buttons along the bottom of the viewer work just like the page buttons: shows the next photo, the one before, and / jump to the start or end. The words in the middle, such as Image 3 of 83, say where you are. When you're looking through every photo, Next carries on to the next page by itself, so you can go through the whole archive without closing the viewer.
The small photos behind the viewer keep up with you: the one you're looking at is highlighted.
The buttons in the top right-hand corner

| Button | What it does |
|---|---|
| 4× zoom | Makes the magnifying glass enlarge 4 times instead of 2½. It turns blue while it's on; click again to turn it off. |
| Sharpen | Makes the photo, and the magnifying glass, look a little crisper. Only how it looks on your screen changes, not the photo itself. Blue while on. |
| Blue circle with a white i | Info: where this photo is kept. See the next section. |
| Four corners ⛶ | Full screen: the photo fills the whole screen, with nothing else showing. Press Esc (top left of the keyboard) to go back. |
| Cross × | Close the viewer and go back to the small photos. |
You can also close the viewer by clicking anywhere on the dark area around it, or by pressing Esc.
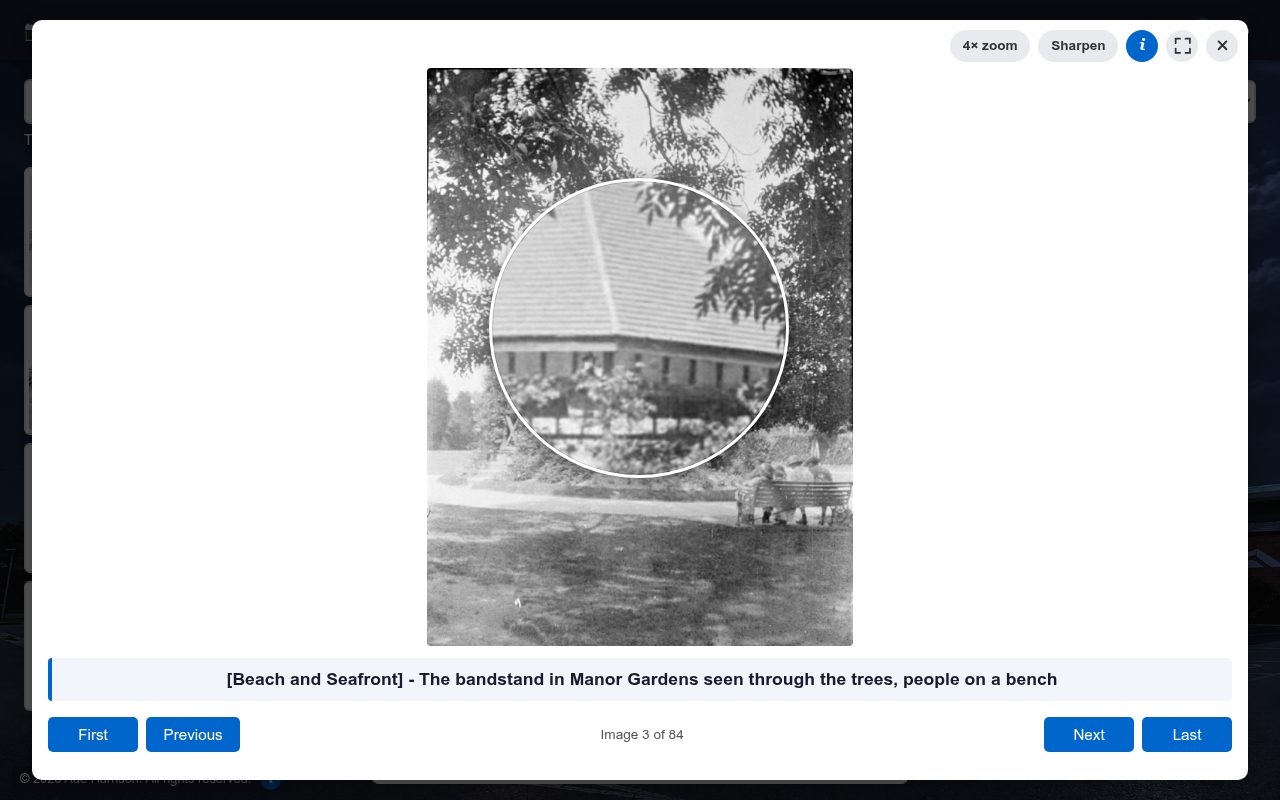
The magnifying glass
Move the mouse over the photo and a round magnifying glass follows it, showing that part of the photo enlarged. It's ideal for reading a shop sign or a date on a postcard. Move the mouse off the photo to put it away. (It works in full screen too.)
For a closer look, click 4× zoom at the top of the viewer, and Sharpen to make edges and lettering crisper. The Image Browser remembers 4× zoom on this computer until you turn it off; Sharpen starts off each time you open a photo. In full screen, where the buttons aren't shown, press Z for 4× zoom and S for Sharpen. They can't add detail the photo doesn't have: a small or blurred original stays soft however much it's enlarged.
8. The "i" (Info) button
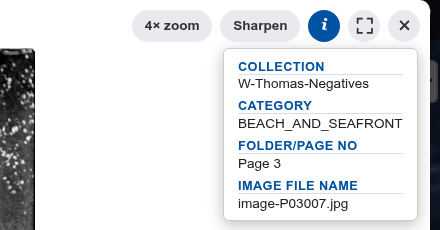
Hold the mouse over the blue i button (or tap it, or press Enter on it) and a small white box opens with four details about where the photo is kept:
| Line | What it means |
|---|---|
| Collection | The collection (album or box) the photo came from. |
| Category | Its category, as written in the project's spreadsheet. |
| Folder/Page No | The page of the album, or the folder, it's in. |
| Image File Name | The name of the photo's file. |
Spotted a mistake, or know something about a photo? Perhaps you recognise a person, or know the year. The project would love to hear. Open the Info box and write down (or photograph) these four lines, then pass them to a member of the project team: they tell the team exactly which photo you mean.
The box closes when you move the mouse away (or press Esc; on a tablet, tap the i again). When you move to another photo it shows that photo's details.
9. Using the keyboard instead of the mouse
You never need the keyboard, but some people find it quicker. Arrow keys are the four keys marked with arrows, usually at the bottom right of the keyboard.
In the viewer
| Key | What it does |
|---|---|
| → right arrow | Next photo |
| ← left arrow | Previous photo |
| ↑ / ↓ up and down arrows | The photo one row up or down on the page behind |
| Home / End | The first or last photo on this page |
| Page Up / Page Down | The previous or next page (when looking through every photo) |
| Z | 4× zoom on or off (the magnifying glass) |
| S | Sharpen on or off |
| Esc | Closes the Info box or leaves full screen; pressed again, closes the viewer |
On the page of small photos
| Key | What it does |
|---|---|
| ↓ in the search box | Moves down onto the first photo (it gets a highlight) |
| Arrow keys | Move the highlight from photo to photo (onto the next page at the end of a page; up from the top row goes back to the search box) |
| Enter or the space bar | Opens the highlighted photo in the viewer |
| Home / End | The first or last photo on this page |
| Page Up / Page Down | The previous or next page |
| Tab | Also moves from one photo to the next |
10. On a tablet or phone
- Tap a photo to open it, and tap the buttons as you would click them.
- There's no mouse to "hold over" things, so the description box under the small photos doesn't appear: open the photo instead, and the description is underneath it.
- Tap the blue i to open the Info box, and tap it again to close it.
- The magnifying glass needs a mouse. On a tablet, use full screen, or spread two fingers apart on the screen to zoom in.
11. If something doesn't work
| What you see | What to do |
|---|---|
| "No images found." | Check the spelling, try fewer or shorter words, and check the two lists are set to All collections and All categories. |
| Nothing happens when I type | Type at least 3 letters, then wait a moment. |
| "Couldn't load the full image." | Click . The message underneath says why, for example that the photo is missing. If it keeps happening, tell a member of the project team which photo it was (the Info box helps). |
| The page looks stuck or strange | Click the title at the top left, or press F5 to reload the page. Nothing is lost. |
| The photo is too small | Use the ⛶ full screen button, or the magnifying glass. |
| This guide is showing and I want the photos again | Press the blue button at the top of the guide: the photos are underneath, just as you left them. (On the screen in the library you can also press Ctrl + Shift + W, or leave it: after a few minutes without anyone using it, the screen goes back to the photos by itself.) |